
In this article I want to guide you how to setup WebSphere Application Server to use SAML as authentication provider for Content Navigator.
A first I need to adress that there are two ways of SAML authentication. The first is the so called IdP initiated SAML where the identity provider initiates the SAML request. And the second one is the SP initiated SAML request, where the service provider (in our case WebSphere/Content Navigator) initiates the request.
We will cover both scenarios with a step-by-step guide. In this guide we have the following system setup.
- IBM Content Navigator 3.0.8
- WebSphere Application Server V9.0 FP11 as SP
- IBM DB2 11.5 FP4
- IBM Security Access Manager / IBM Cloud Identity as IdP
For more information about WebSphere Application Server SAML configuration please refer tho the following IBM Infocenter article.
- Prepare Content Navigator for SAML
At first you need to deploy Content Navigator with „application server authentication“ so use SSO in generell independently of you prefered SSO method.
Open the Content Navigator Configuration and Deployment Tool and create a new profile or reuse a existing one. Complete all for you repository type necessary steps.
In the „Configure the IBM Content Navigator Web Application“ task select the application server authentication as you Content Navigator authentication method.
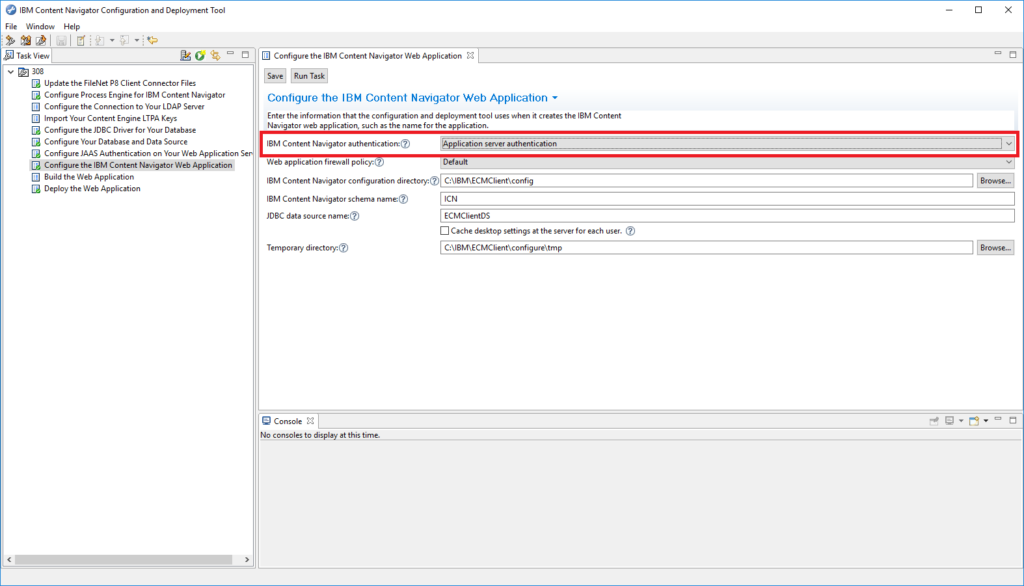
Finish your deployment and restart WebSphere Application Server.
2. Prepare WebSphere Application Server for SAML
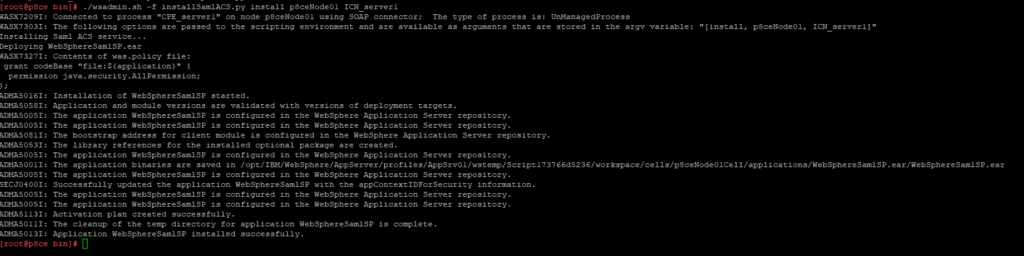
At first you need to install the WebSphere SAMLSP.ear to you application server with the following wsadmin command.
wsadmin.sh/bat -f installSamlACS.py install <NodeName> <ServerName>
If you have a HTTP Server in front of your WebSphere AS map the application also to the HTTP Server.

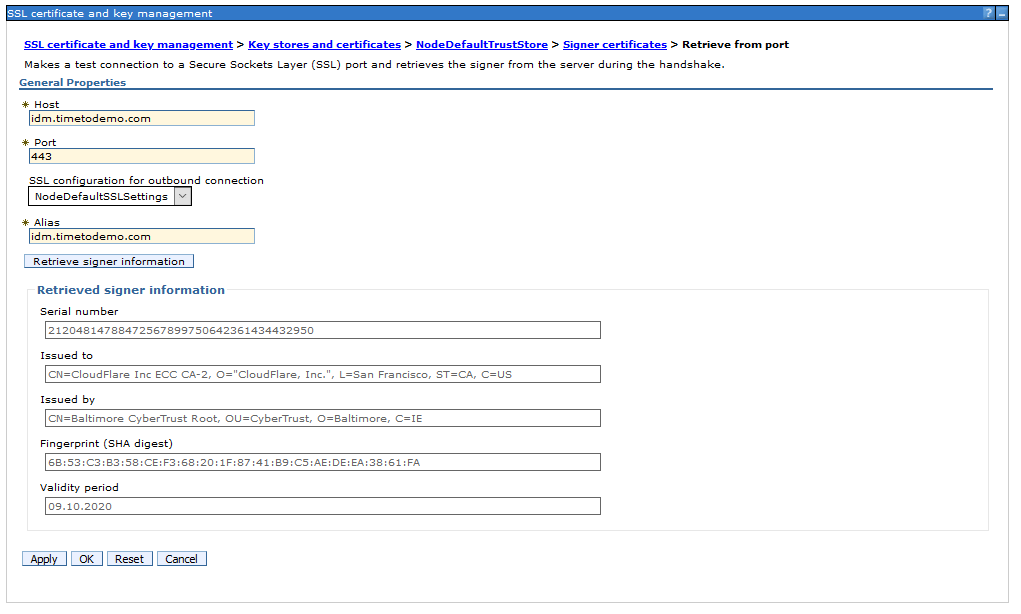
Import the IdP SSL certificate on your SSL truststore.
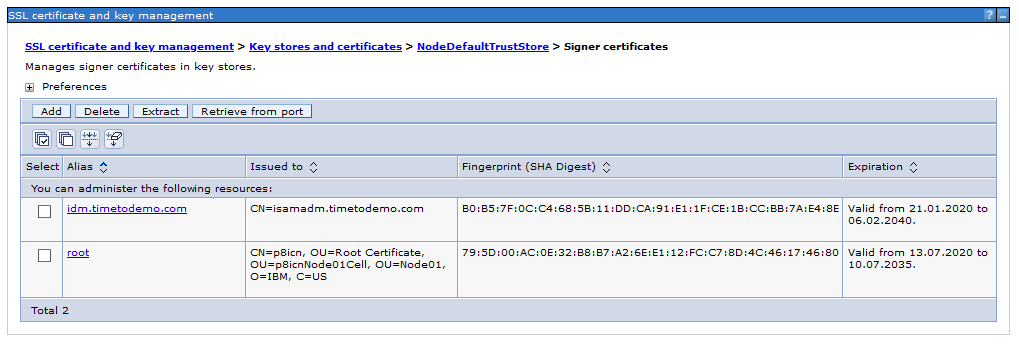
A easy way to do this is just to retrieve it from the SSL port of the IdP.
The next step is to create a new TAI interceptor in the global security. Logon to the WebSphere ISC and create the new interceptor.
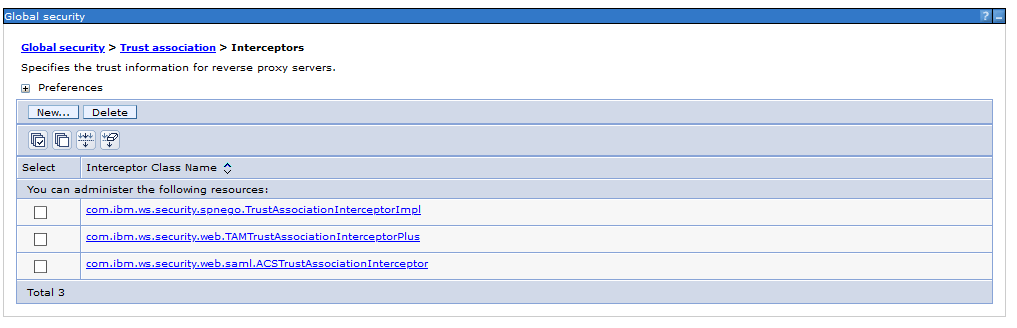
Add the following custom properties. Here it depends also a little bit on your IdP which parameters a required and which are optional. In my case these are the settings for ISAM.
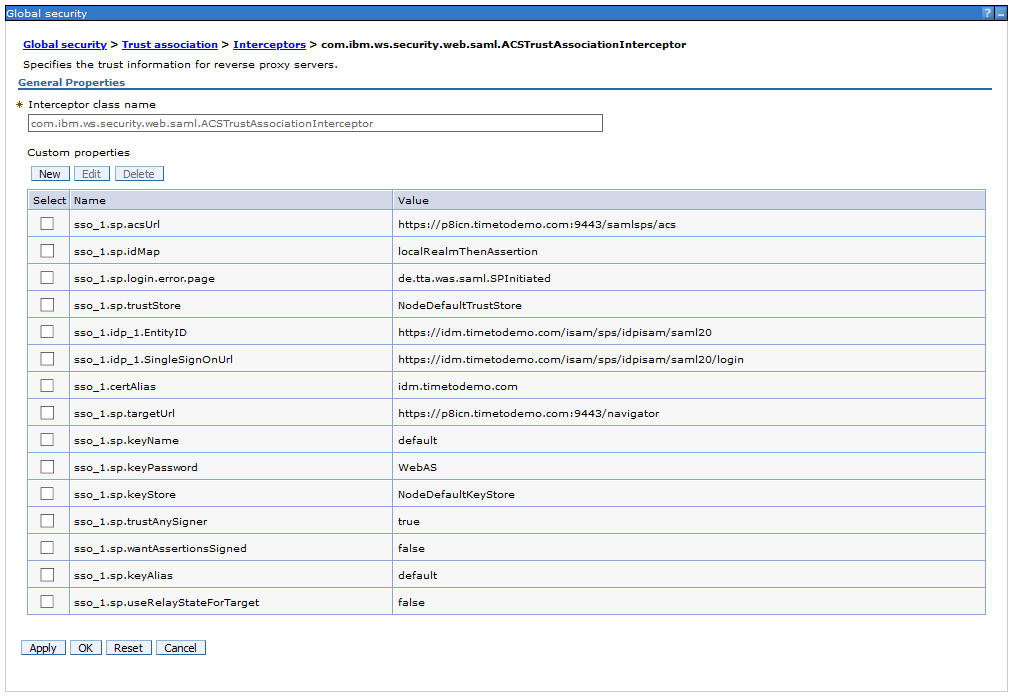
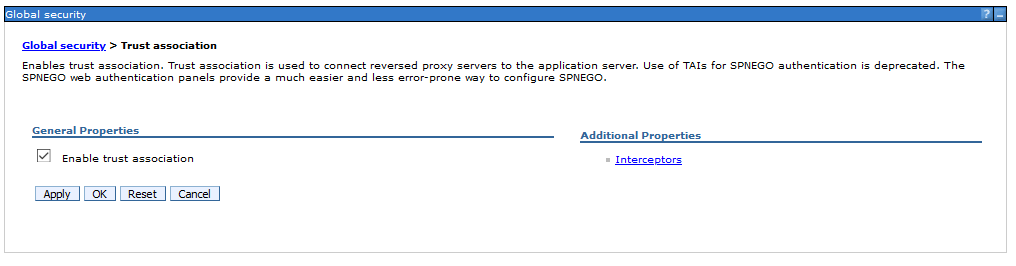
After adding the required properties activate the trust association.
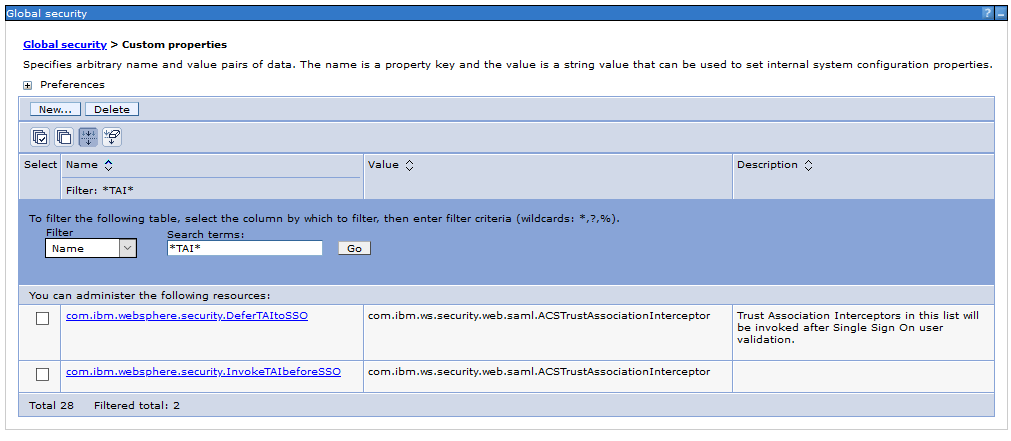
Add the following custom properties to the global security.
| com.ibm.websphere.security.DeferTAItoSSO | com.ibm.ws.security.web.saml.ACSTrustAssociationInterceptor |
| com.ibm.websphere.security.InvokeTAIbeforeSSO | com.ibm.ws.security.web.saml.ACSTrustAssociationInterceptor |
Now we need to import the IdP metadata into our TAI configuration with the wsadmin command.
wsadmin.sh/bat -lang jython
AdminTask.importSAMLIdpMetadata(‚-idpMetadataFileName C:\IBM\SAML\idp_meta.xml signingCertAlias idm.timetodemo.com‘)

AdminConfig.save()
Now we need to export the SP metadata that needs to be imported by the IdP. You can do this again with the wsadmin command.
AdminTask.exportSAMLSpMetadata(‚-spMetadataFileName C:\IBM\SAML\sp_meta.xml -ssoId 1‘)

To verify your IdP configuration you can show the SAML config.
AdminTask.showSAMLIdpPartner(‚-ssoId 1‘)

Now you have finished the basic SAML configuration in your WebSphere Application Server that is identical for IdP and SP initiated SAML.
3. Custom configuration for IdP initiated SAML
In this chapter I will guide you how to setup the IdP initiated SAML. There are some properties in the TAI interceptor where you can control the behavior of SAML.
To enable the IdP initiated Request you need to change the sso_1.sp.login.error.page parameter to the URL that calls the IdP and the relay adress of your WAS ACS and Content Navigator.
e.g.:
https://idm.timetodemo.com/isam/sps/idpisam/saml20/logininitial?PartnerSpid=https://p8icn.timetodemo.com:9443/samlsps/acs&RelayState=https://p8icn.timetodemo.com:9443/navigator
Please keep in mind that the URL above is a example for ISAM and IBM Cloud Identity. Your IdP may require some changes in the URL properties. You should consult your IdP administrator before set this property.
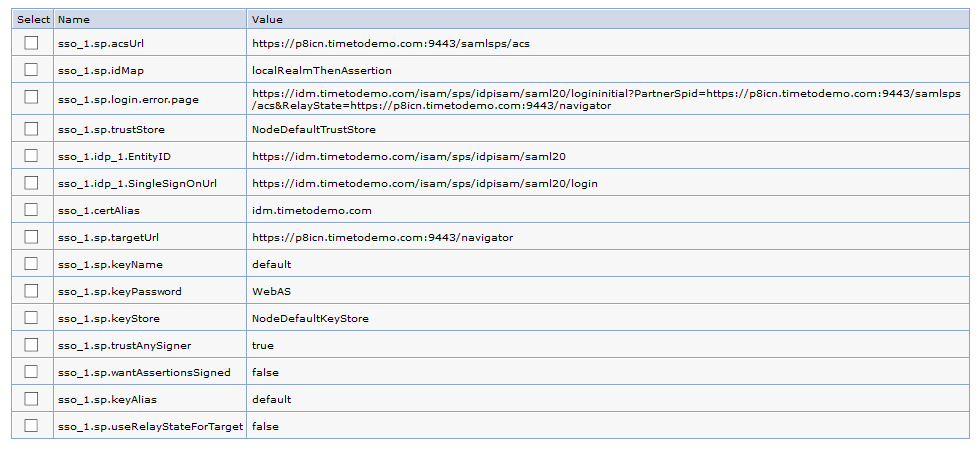
The second parameter you should set to false is the „useRelayStateForTarget“. This controls whether you want to use the value of RelayState in the client request as the URL of the target application. If you set this to true (default) the IdP will relay you to the „acsURL“ adress. But in our case we want to be reroutet to the „targetURL“ parameter. So useRelayStateForTarget = false is the correct setting for us here.
If you need some more information about the properties you can define, please refer to the following IBM infocenter artiicle:
Now you have finished all required configuration steps to use IdP initiated SAML for IBM Content Navigator.
4. Custom configuration for SP initiated SAML
The next chapter will describe how to configure the TAI interceptor to use SP initiated SAML. For SP initiated SAML you need to modify the sso_1.sp.login.error.page property to use your custom JAVA class, where you create the SAML request.
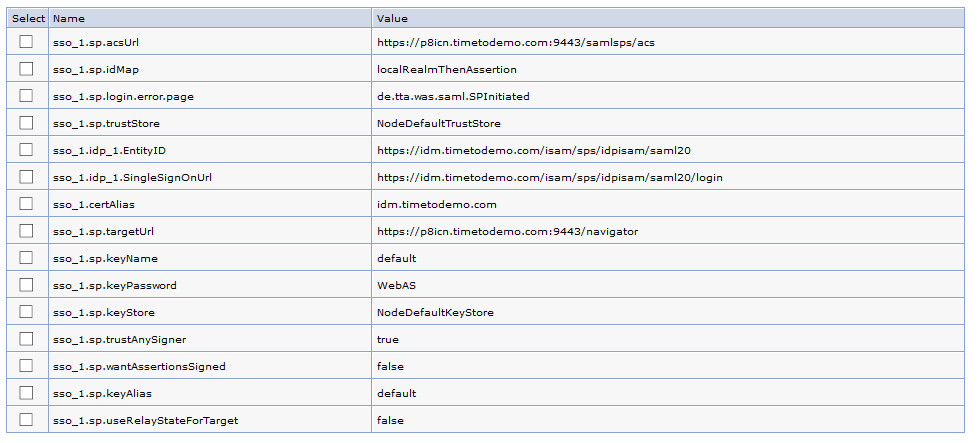
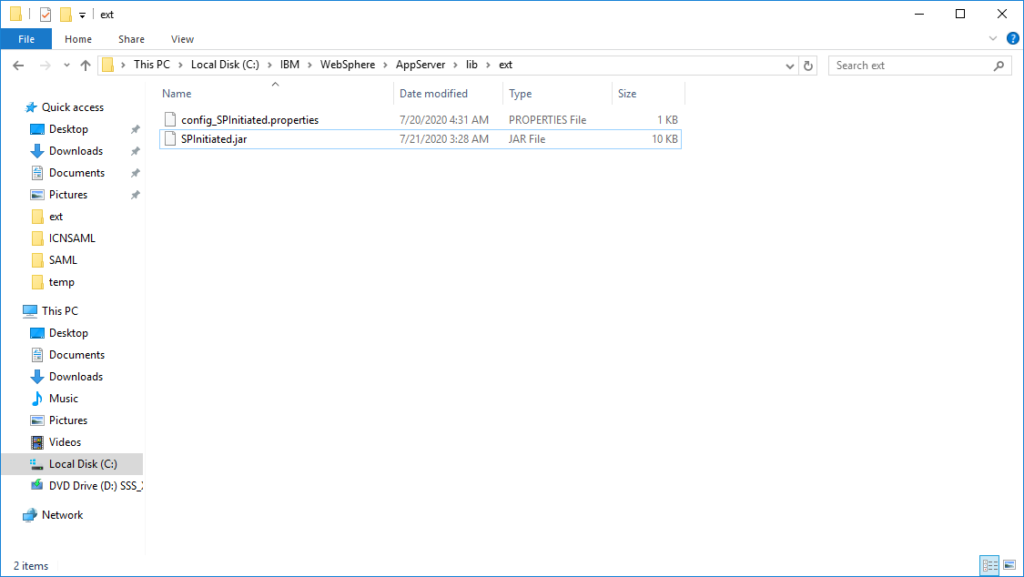
In my case I wrote a class called „de.tta.was.saml.SPInitiated“. You need to place the JAR file in your WebSphere Application Server external library path. E.g: C:\IBM\WebSphere\AppServer\lib\ext.
I used the following code snipped as base for developing the java class, that is provided in this IBM infocenter article:
import java.util.ArrayList;
                import java.util.HashMap;
                import javax.servlet.http.HttpServletRequest;
                import com.ibm.websphere.security.NotImplementedException;
                import com.ibm.ws.wssecurity.saml.common.util.UTC;
                import com.ibm.wsspi.security.web.saml.AuthnRequestProvider;
                .........

                public HashMap <String, String> getAuthnRequest(HttpServletRequest req, String errorMsg,
			   String acsUrl, ArrayList<String> ssoUrls)
	        throws NotImplementedException {

	        //create map with following keys
	        HashMap <String, String> map = new HashMap <String, String>();

	        String ssoUrl = "https://example.com/saml20/Login";
	        map.put(AuthnRequestProvider.SSO_URL, ssoUrl);

	        String relayState = generateRandom();
	        map.put(AuthnRequestProvider.RELAY_STATE, relayState);

	        String requestId = generateRandom();
	        map.put(AuthnRequestProvider.REQUEST_ID, requestId);

	        //create AuthnRequest
	        String authnMessage = "<?xml version=\"1.0\" encoding=\"UTF-8\"?>"
				   +"<samlp:AuthnRequest xmlns:samlp=\"urn:oasis:names:tc:SAML:2.0:protocol\" "
				   +"ID=\""+requestID+"\" Version=\"2.0\" "
				   + "IssueInstant=\"" +UTC.format(new java.util.Date())+ "\" ForceAuthn=\"false\" IsPassive=\"false\""
				   + "ProtocolBinding=\"urn:oasis:names:tc:SAML:2.0:bindings:HTTP-POST\" "
				   + "AssertionConsumerServiceURL=\"" +acs+"\" "
				   + "Destination=\"" +destination +"\"> "
				   + "<saml:Issuer xmlns:saml=\"urn:oasis:names:tc:SAML:2.0:assertion\">"
				   + issuer
				   +"</saml:Issuer> <samlp:NameIDPolicy"
				   +"Format=\"urn:oasis:names:tc:SAML:2.0:nameid-format:transient\""
				   +"SPNameQualifier=\"mysp\""
				   +"AllowCreate=\"true\" /> <samlp:RequestedAuthnContext Comparison=\"exact\"> "
				   +"<saml:AuthnContextClassRef xmlns:saml=\"urn:oasis:names:tc:SAML:2.0:assertion\">"
			         +"urn:oasis:names:tc:SAML:2.0:ac:classes:</samlp:RequestedAuthnContext> </samlp:AuthnRequest>";

	        map.put(AuthnRequestProvider.AUTHN_REQUEST, authnMessage);
                return map;
	        }
             private String generateRandom() {
             //implement code that generates a random alpha numeric String that is unique
             //each time it is invoked and cannot be easily predicted (like a counter)
             }
5. Troubleshooting
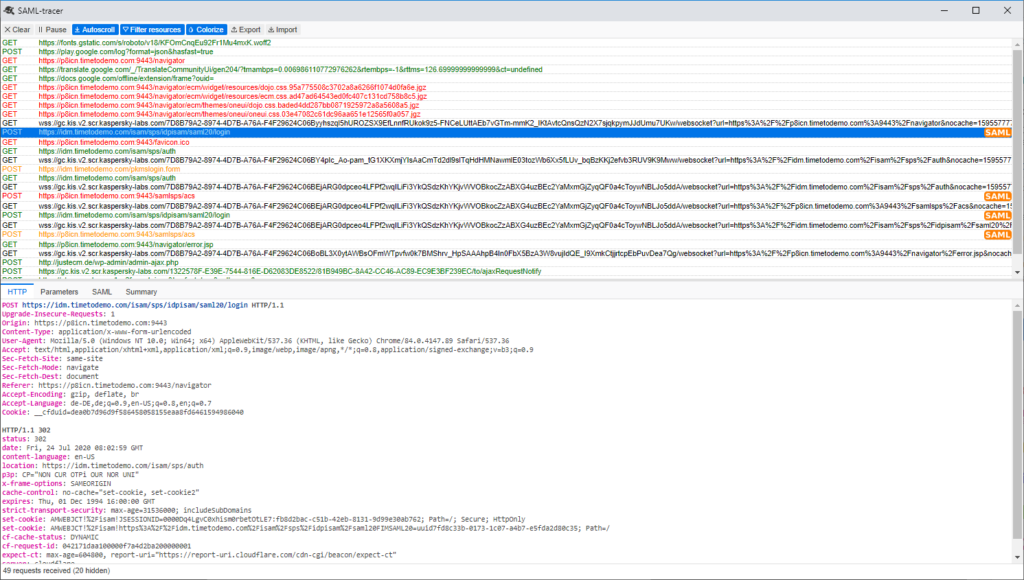
Specially when you use SP initiated SAML you may experience some issue with the created SAML request. A good way for debugging is the use of the browser addon „SAML-tracer“. You can check the request generated by your java class and also see why the IdP may reject it.
If you have question regarding this article feel free to contact me.
Over and out :-).